
Apologies up front if this 'Appendix' idea goes against the 'the only one' theme of the main Windscreen and Buffeting thread... I'd be happy to move this topic into that thread but it is getting a bit long... so didn't want to clog it up. Happy to rename this if inappropriate too.
Following on from my initial post here.
Herewith my guide to making your own Air Flares for the Glee:
Disclaimer - this is free advice and probably worth every penny. Please don't melt your bike and/or create something that distracts you and makes you fall off it at speed (or stationary for that matter!)... or anything like that. Oh... and please don't blame me if something goes wrong. I'm quite brave around the workshop although with no appropriate training. I've learned by trial and error and might be underestimating how easy I thought this was, or what a risk I took pressing (reasonably) hot Perspex to the plastic fairing of my prized Glee. I've never worked with Perspex until now... if that helps... but I've used a jigsaw and drill before. I wear eye protection these days too :thumbup: and so far so good. No Glee was hurt in the making of this article and there was no blood, burns or blindness suffered afterward by anyone involved or standing nearby. :fineprint:
WARNING: The design isn't perfect and you will need to somehow protect the plastics from being scratched when riding and the air pushes the Air Flares inwards toward the fairing. I'm still trying to figure out a permanent solution (ideas welcome!) but for now I'm using rubber sticker discs normally used under furniture. Glass protector buttons also work, and with one prototype I stuck foam rubber all along the edges, which really protects everything... but doesn't look too good.
What you'll need:
- Longer bolts than the ones in the fairing. I used ones about 50mm / 2" long. There is a limit to the length. If you feel around inside the fairing you'll realise there's something metal there that will eventually get in the way of the bolt if it's too long.
- Paper or cardboard to create a template.
- An A4 (roughly) sized sheet of Perspex or suitable material - I got mine from a signage company - just walked in and asked for an off-cut... cost - $0
- Suitable saw to cut out the shape
- Sandpaper to smooth things around the edges
- Plumbers torch or heat gun or some such thing with which to heat up the Perspex so that you can bend it. Lots of 'how to' stuff on YouTube... it surprised me how easy it is if you have a torch. I wouldn't be surprised if you could do it with a candle and some patience.
- Drill to make mounting holes. I used about a 6mm wood drill bit (I wanted the hole to be larger than the bolt to avoid stressing the Perspex).
- Rubber spacers / washers. I used a thick, hard rubber tap washer, surrounded by soft (old bicycle inner tube) cut outs, plus a metal washer on the outside.
- Something to protect the fairing from the Air Flare rubbing against it. As per warning above.
- A sip of good ale really helps now and then :yesnod:
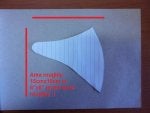
Step 1:
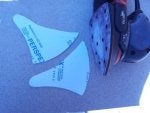
Start out with this shape
![Image]()
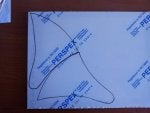
Step 2:
Transfer this shape to your choice of material.
I tried with a thinner Perspex first, then opted to go with this 3mm stuff. There are pros and cons to the choice, around flexibility, durability, etc. My bike is garaged day and night and mostly on tarmac. They are pretty easy to make once you get the hang of it... so try different thicknesses and see what works best for you. I'm not sure if this methods works on anything other than Perspex though. So please do some research on how to bend other materials before simply aiming a flame at it.
Tip: Try leaving the protective film on to prevent scratching until you use the heat gun... then it needs to be off.
Tip: Make a few extra templates. Once you've bent them you'll realise how impossible it is to copy them again")
![Image]()
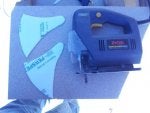
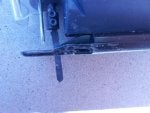
Step 3:
Cut them out with a metal hacksaw / blade (or better if you know how). My jigsaw on medium speed worked OK.
Cut slowly, and watch out for heat buildup. The Perspex will likely melt here and there along your cuts. Sometimes it re-connects to the other half and bonds so strongly you have to cut it again :headbang:
Try as far as possible to keep the material steady and avoid too much vibration/flexing. Just when you think you've finished with that last little bit to go, it might crack and you've got to start again :jawdrop:
![Image]()
![Image]()
Step 4:
Sand down edges by hand or with a sander. The finer the paper the cleaner you'll get the edges apparently. I just used standard '60' gauge sandpaper that came with my sander.
![Image]()
Step 5:
Remove fairing bolt and store somewhere safe. You'll need to use a longer one if you're going to use enough rubber spacers to reduce vibration and permit some flexibility. See 'What you'll need' above.
Step 6:
Make sure you know where you want to position your Air Flare. I put these stickers on to show what I was lining things up with to try make something that kinda fits the lines of the fairing.
Hmmm... seems I've reach my limit of file attachments. Follow on post coming up!
Following on from my initial post here.
Herewith my guide to making your own Air Flares for the Glee:
Disclaimer - this is free advice and probably worth every penny. Please don't melt your bike and/or create something that distracts you and makes you fall off it at speed (or stationary for that matter!)... or anything like that. Oh... and please don't blame me if something goes wrong. I'm quite brave around the workshop although with no appropriate training. I've learned by trial and error and might be underestimating how easy I thought this was, or what a risk I took pressing (reasonably) hot Perspex to the plastic fairing of my prized Glee. I've never worked with Perspex until now... if that helps... but I've used a jigsaw and drill before. I wear eye protection these days too :thumbup: and so far so good. No Glee was hurt in the making of this article and there was no blood, burns or blindness suffered afterward by anyone involved or standing nearby. :fineprint:
WARNING: The design isn't perfect and you will need to somehow protect the plastics from being scratched when riding and the air pushes the Air Flares inwards toward the fairing. I'm still trying to figure out a permanent solution (ideas welcome!) but for now I'm using rubber sticker discs normally used under furniture. Glass protector buttons also work, and with one prototype I stuck foam rubber all along the edges, which really protects everything... but doesn't look too good.
What you'll need:
- Longer bolts than the ones in the fairing. I used ones about 50mm / 2" long. There is a limit to the length. If you feel around inside the fairing you'll realise there's something metal there that will eventually get in the way of the bolt if it's too long.
- Paper or cardboard to create a template.
- An A4 (roughly) sized sheet of Perspex or suitable material - I got mine from a signage company - just walked in and asked for an off-cut... cost - $0
- Suitable saw to cut out the shape
- Sandpaper to smooth things around the edges
- Plumbers torch or heat gun or some such thing with which to heat up the Perspex so that you can bend it. Lots of 'how to' stuff on YouTube... it surprised me how easy it is if you have a torch. I wouldn't be surprised if you could do it with a candle and some patience.
- Drill to make mounting holes. I used about a 6mm wood drill bit (I wanted the hole to be larger than the bolt to avoid stressing the Perspex).
- Rubber spacers / washers. I used a thick, hard rubber tap washer, surrounded by soft (old bicycle inner tube) cut outs, plus a metal washer on the outside.
- Something to protect the fairing from the Air Flare rubbing against it. As per warning above.
- A sip of good ale really helps now and then :yesnod:
Step 1:
Start out with this shape
Step 2:
Transfer this shape to your choice of material.
I tried with a thinner Perspex first, then opted to go with this 3mm stuff. There are pros and cons to the choice, around flexibility, durability, etc. My bike is garaged day and night and mostly on tarmac. They are pretty easy to make once you get the hang of it... so try different thicknesses and see what works best for you. I'm not sure if this methods works on anything other than Perspex though. So please do some research on how to bend other materials before simply aiming a flame at it.
Tip: Try leaving the protective film on to prevent scratching until you use the heat gun... then it needs to be off.
Tip: Make a few extra templates. Once you've bent them you'll realise how impossible it is to copy them again
Step 3:
Cut them out with a metal hacksaw / blade (or better if you know how). My jigsaw on medium speed worked OK.
Cut slowly, and watch out for heat buildup. The Perspex will likely melt here and there along your cuts. Sometimes it re-connects to the other half and bonds so strongly you have to cut it again :headbang:
Try as far as possible to keep the material steady and avoid too much vibration/flexing. Just when you think you've finished with that last little bit to go, it might crack and you've got to start again :jawdrop:
Step 4:
Sand down edges by hand or with a sander. The finer the paper the cleaner you'll get the edges apparently. I just used standard '60' gauge sandpaper that came with my sander.
Step 5:
Remove fairing bolt and store somewhere safe. You'll need to use a longer one if you're going to use enough rubber spacers to reduce vibration and permit some flexibility. See 'What you'll need' above.
Step 6:
Make sure you know where you want to position your Air Flare. I put these stickers on to show what I was lining things up with to try make something that kinda fits the lines of the fairing.
Hmmm... seems I've reach my limit of file attachments. Follow on post coming up!